Network virtualization with VXLAN
Vincent Bernat
Virtual eXtensible Local Area Network (VXLAN) is a protocol to overlay a virtualized L2 network over an existing IP network with little setup. It is currently described in an Internet-Draft. It adds the following perks to VLANs while still providing isolation:
- It uses a 24-bit VXLAN Network Identifier (VNI) which should be enough to address any scale-based concerns of multitenancy.
- It wraps L2 frames into UDP datagrams. This allows one to rely on some interesting properties of IP networks like availability and scalability. A VXLAN segment can be extended far beyond the typical reach of today’s VLANs.
The VXLAN Tunnel End Point (VTEP) originates and terminates VXLAN tunnels. Thanks to a series of patches from Stephen Hemminger, Linux can now act as a VTEP (Linux 3.7). Let’s see how this works.
Update (2017-05)
The implementation exposed in this post heavily relies on multicast. A followup exploring the use of unicast is available, as well as another one about BGP EVPN.
Update (2018-10)
In August 2014, the Internet-Draft has been published as RFC 7348.
About IPv6#
When possible, I try to use IPv6 for my labs. This is not the case here for several reasons:
- IP multicast is required and PIM-SM implementations for IPv6 are not widespread yet. However, they exist. This explains why I use XORP for this lab: it supports PIM-SM for both IPv4 and IPv6.
- VXLAN Internet-Draft specifically addresses only IPv4. This seems a bit odd for a protocol running on top of UDP and I hope this will be fixed soon. This is not a major stopper since some VXLAN implementations support IPv6.
- However, the current implementation for Linux does not support IPv6. IPv6 support will be added later.
Once IPv6 support is available, the lab should be easy to adapt.
Update (2017-01)
The latest draft addresses IPv6 support. It is available in Linux 3.12. VXLAN is much improved with Linux 3.12: DOVE extensions support (3.8), improved offload support (3.8+), unicast support (3.10), and IPv6 support (3.12).
Lab#
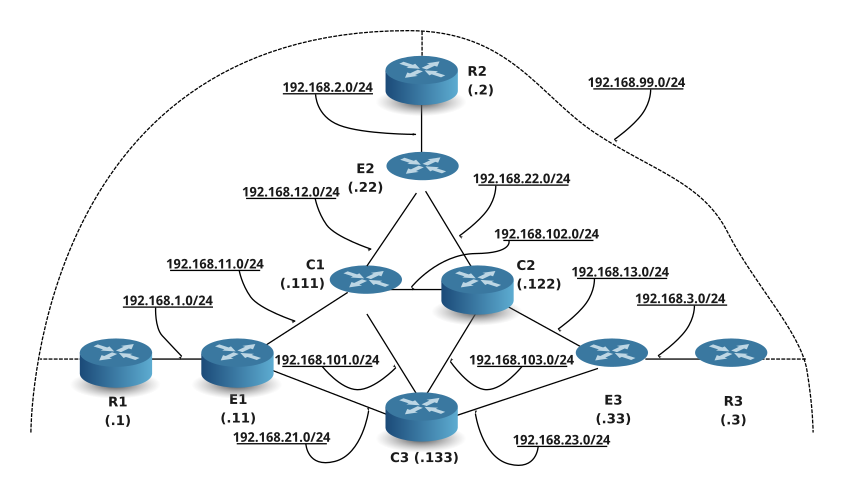
So, here is the lab used. R1, R2 and R3 will act as VTEPs. They
do not make use of PIM-SM. Instead, they have a generic multicast route
on eth0. E1, E2 and E3 are edge routers while C1, C2 and
C3 are core routers. The proposed lab is not resilient but
convenient to explain how things work. It is built on top of QEMU
hosts. Have a look at my previous article for more details on
this.
The lab is hosted on GitHub. I have made the lab easier to try by
including the kernel I have used for my tests. XORP comes
preconfigured, you just have to configure the VXLAN part. For this,
you need a recent version of ip.
$ sudo apt-get install screen vde2 qemu-system-x86 iproute xorp git
$ git clone git://git.kernel.org/pub/scm/linux/kernel/git/shemminger/iproute2.git
$ cd iproute2
$ ./configure && make
You get `ip' as `ip/ip' and `bridge' as `bridge/bridge'.
$ cd ..
$ git clone git://github.com/vincentbernat/network-lab.git
$ cd network-lab/lab-multicast-vxlan
$ ./setup
Unicast routing#
The first step is to setup unicast routing. OSPF is used for this
purpose. The chosen routing daemon is XORP. With xorpsh, we can
check if OSPF is working as expected:
root@c1# xorpsh
root@c1$ show ospf4 neighbor
  Address         Interface             State      ID              Pri  Dead
192.168.11.11    eth0/eth0              Full      3.0.0.1          128    36
192.168.12.22    eth1/eth1              Full      3.0.0.2          128    33
192.168.101.133  eth2/eth2              Full      2.0.0.3          128    36
192.168.102.122  eth3/eth3              Full      2.0.0.2          128    38
root@c1$ show route table ipv4 unicast ospf
192.168.1.0/24  [ospf(110)/2]
                > to 192.168.11.11 via eth0/eth0
192.168.2.0/24  [ospf(110)/2]
                > to 192.168.12.22 via eth1/eth1
192.168.3.0/24  [ospf(110)/3]
                > to 192.168.102.122 via eth3/eth3
192.168.13.0/24 [ospf(110)/2]
                > to 192.168.102.122 via eth3/eth3
192.168.21.0/24 [ospf(110)/2]
                > to 192.168.101.133 via eth2/eth2
192.168.22.0/24 [ospf(110)/2]
                > to 192.168.12.22 via eth1/eth1
192.168.23.0/24 [ospf(110)/2]
                > to 192.168.101.133 via eth2/eth2
192.168.103.0/24        [ospf(110)/2]
                > to 192.168.102.122 via eth3/eth3
Multicast routing#
Once unicast routing is up and running, we need to setup multicast routing. There are two protocols for this: IGMP and PIM-SM. The former one allows hosts to subscribe to a multicast group while the latter one enables routers to distribute multicast routes.
IGMP#
IGMP is used by hosts and adjacent routers to establish multicast
group membership. In our case, it will be used by R2 to let E2
know it subscribed to 239.0.0.11 (a multicast group).
Configuring XORP to support IGMP is simple. Let’s test with iperf to
have a multicast listener on R2:
root@r2# iperf -u -s -l 1000 -i 1 -B 239.0.0.11
Server listening on UDP port 5001
Binding to local address 239.0.0.11
Joining multicast group  239.0.0.11
Receiving 1000 byte datagrams
UDP buffer size:  208 KByte (default)
On E2, we can now check that R2 is properly registered for
239.0.0.11:
root@e2$ show igmp group
Interface    Group           Source          LastReported Timeout V State
eth0         239.0.0.11      0.0.0.0         192.168.2.2      248 2     E
XORP documentation contains a good overview of IGMP.
PIM-SM#
PIM-SM is far more complex. It does not have its own topology discovery protocol and relies on routing information from other protocols, OSPF in our case.
I will describe here a simplified view on how PIM-SM works. XORP documentation contains more details about PIM-SM.
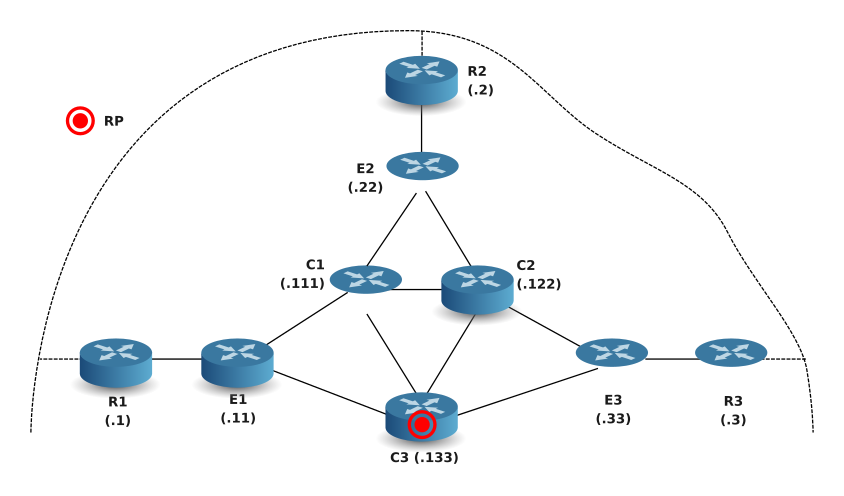
The first step for all PIM-SM routers is to elect a rendez-vous
point (RP). In our lab, only C1, C2 and C3 have been
configured to be elected as a RP. Moreover, we give better priority to
C3 to ensure it wins.
root@e1$ show pim rps
RP              Type      Pri Holdtime Timeout ActiveGroups GroupPrefix
192.168.101.133 bootstrap 100      150     135            0 239.0.0.0/8
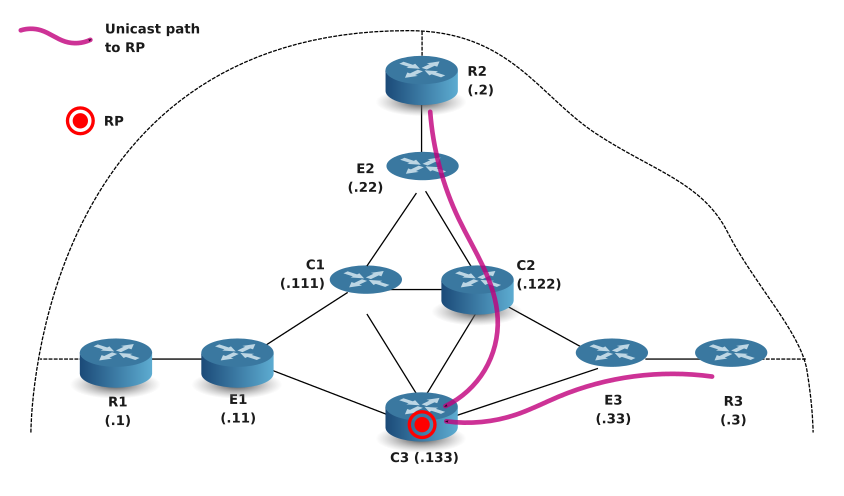
Suppose we start iperf on both R2 and R3. Using IGMP, they
subscribe to multicast group 239.0.0.11 with E2 and E3
respectively. Then, E2 and E3 send a join message (also known as a
(*,G) join) to the RP (C3) for that multicast group. Using the
unicast path from E2 and E3 to the RP, the routers along the
paths build the RP tree (RPT), rooted at C3. Each router in the
tree knows how to send multicast packets to 239.0.0.11: it will send
them to the leaves.
root@e3$ show pim join
Group           Source          RP              Flags
239.0.0.11      0.0.0.0         192.168.101.133 WC
    Upstream interface (RP):   eth2
    Upstream MRIB next hop (RP): 192.168.23.133
    Upstream RPF'(*,G):        192.168.23.133
    Upstream state:            Joined
    Join timer:                5
    Local receiver include WC: O...
    Joins RP:                  ....
    Joins WC:                  ....
    Join state:                ....
    Prune state:               ....
    Prune pending state:       ....
    I am assert winner state:  ....
    I am assert loser state:   ....
    Assert winner WC:          ....
    Assert lost WC:            ....
    Assert tracking WC:        O.O.
    Could assert WC:           O...
    I am DR:                   O..O
    Immediate olist RP:        ....
    Immediate olist WC:        O...
    Inherited olist SG:        O...
    Inherited olist SG_RPT:    O...
    PIM include WC:            O...
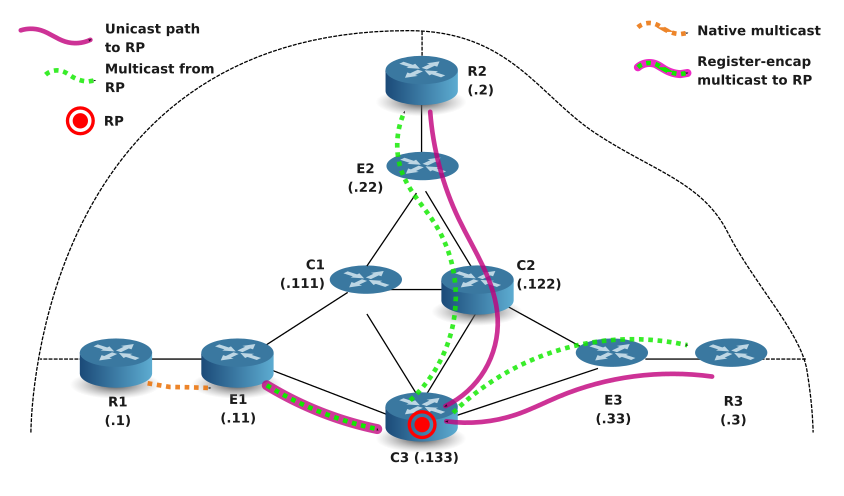
Suppose that R1 wants to send multicast packets to
239.0.0.11. It sends them to E1 which does not have any
information on how to contact all the members of the multicast group
because it is not the RP. Therefore, it encapsulates the multicast
packets into PIM Register packets and sends them to the RP. The RP
decapsulates them and sends them natively. The multicast packets are
routed from the RP to R2 and R3 using the reverse path formed by
the join messages.
root@r1# iperf -c 239.0.0.11 -u -b 10k -t 30 -T 10
Client connecting to 239.0.0.11, UDP port 5001
Sending 1470 byte datagrams
Setting multicast TTL to 10
UDP buffer size:  208 KByte (default)
root@e1# tcpdump -pni eth0
10:58:23.424860 IP 192.168.1.1.35277 > 239.0.0.11.5001: UDP, length 1470
root@c3# tcpdump -pni eth0
10:58:23.552903 IP 192.168.11.11 > 192.168.101.133: PIMv2, Register, length 1480
root@e2# tcpdump -pni eth0
10:58:23.896171 IP 192.168.1.1.35277 > 239.0.0.11.5001: UDP, length 1470
root@e3# tcpdump -pni eth0
10:58:23.824647 IP 192.168.1.1.35277 > 239.0.0.11.5001: UDP, length 1470
As presented here, the routing is not optimal: packets from R1 to
R2 could avoid the RP. Moreover, encapsulating multicast packets
into unicast packets is not efficient either. At some point, the RP
will decide to switch to native multicast.1 Rooted at R1,
the shortest-path tree (SPT) for the multicast group will be built
using source-specific join messages (also known as a (S,G) join).
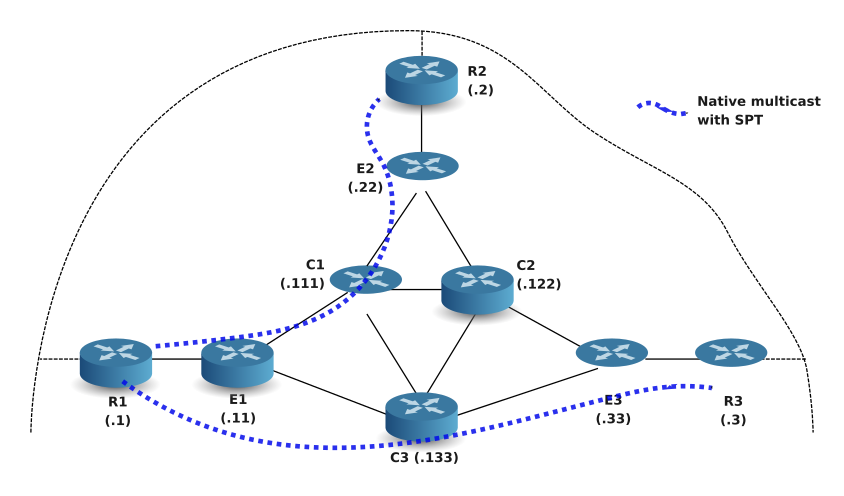
From here, each router in the tree knows how to handle multicast
packets from R1 to the group without involving the RP. For example,
E1 knows it must duplicate the packet and send one through the
interface to C3 and the other one through the interface to C1:
root@e1$ show pim join
Group           Source          RP              Flags
239.0.0.11      192.168.1.1     192.168.101.133 SG SPT DirectlyConnectedS
    Upstream interface (S):    eth0
    Upstream interface (RP):   eth1
    Upstream MRIB next hop (RP): 192.168.11.111
    Upstream MRIB next hop (S):  UNKNOWN
    Upstream RPF'(S,G):        UNKNOWN
    Upstream state:            Joined
    Register state:            RegisterPrune RegisterCouldRegister
    Join timer:                7
    KAT(S,G) running:          true
    Local receiver include WC: ....
    Local receiver include SG: ....
    Local receiver exclude SG: ....
    Joins RP:                  ....
    Joins WC:                  ....
    Joins SG:                  .OO.
    Join state:                .OO.
    Prune state:               ....
    Prune pending state:       ....
    I am assert winner state:  ....
    I am assert loser state:   ....
    Assert winner WC:          ....
    Assert winner SG:          ....
    Assert lost WC:            ....
    Assert lost SG:            ....
    Assert lost SG_RPT:        ....
    Assert tracking SG:        OOO.
    Could assert WC:           ....
    Could assert SG:           .OO.
    I am DR:                   O..O
    Immediate olist RP:        ....
    Immediate olist WC:        ....
    Immediate olist SG:        .OO.
    Inherited olist SG:        .OO.
    Inherited olist SG_RPT:    ....
    PIM include WC:            ....
    PIM include SG:            ....
    PIM exclude SG:            ....
root@e1$ show pim mfc
Group           Source          RP
239.0.0.11      192.168.1.1     192.168.101.133
    Incoming interface :      eth0
    Outgoing interfaces:      .OO.
root@e1$ exit
[Connection to XORP closed]
root@e1# ip mroute
(192.168.1.1, 239.0.0.11)        Iif: eth0       Oifs: eth1 eth2
Setting up VXLAN#
Once IP multicast is running, setting up VXLAN is quite easy. Here are the software requirements:
- A recent kernel. Pick at least 3.7-rc3. You need to enable
CONFIG_VXLANoption. You also currently need a patch on top of it to be able to specify a TTL greater than 1 for multicast packets. - A recent version of
ip. Currently, you need the version from git.
On R1, R2 and R3, we create a vxlan42 interface with the following commands:
root@rX# ./ip link add vxlan42 type vxlan id 42 \
>           group 239.0.0.42 \
>           ttl 10 dev eth0
root@rX# ip link set up dev vxlan42
root@rX# ./ip -d link show vxlan42
10: vxlan42: <BROADCAST,MULTICAST,UP,LOWER_UP> mtu 1460 qdisc noqueue state UNKNOWN mode DEFAULT
link/ether 3e:09:1c:e1:09:2e brd ff:ff:ff:ff:ff:ff
vxlan id 42 group 239.0.0.42 dev eth0 port 32768 61000 ttl 10 ageing 300
Let’s assign an IP in 192.168.99.0/24 for each router and check they can ping each other:
root@r1# ip addr add 192.168.99.1/24 dev vxlan42
root@r2# ip addr add 192.168.99.2/24 dev vxlan42
root@r3# ip addr add 192.168.99.3/24 dev vxlan42
root@r1# ping 192.168.99.2
PING 192.168.99.2 (192.168.99.2) 56(84) bytes of data.
64 bytes from 192.168.99.2: icmp_req=1 ttl=64 time=3.90 ms
64 bytes from 192.168.99.2: icmp_req=2 ttl=64 time=1.38 ms
64 bytes from 192.168.99.2: icmp_req=3 ttl=64 time=1.82 ms

--- 192.168.99.2 ping statistics ---
3 packets transmitted, 3 received, 0% packet loss, time 2003ms
rtt min/avg/max/mdev = 1.389/2.375/3.907/1.098 ms
We can check the packets are encapsulated:
root@r1# tcpdump -pni eth0
tcpdump: verbose output suppressed, use -v or -vv for full protocol decode
listening on eth0, link-type EN10MB (Ethernet), capture size 65535 bytes
11:30:36.561185 IP 192.168.1.1.43349 > 192.168.2.2.8472: UDP, length 106
11:30:36.563179 IP 192.168.2.2.33894 > 192.168.1.1.8472: UDP, length 106
11:30:37.562677 IP 192.168.1.1.43349 > 192.168.2.2.8472: UDP, length 106
11:30:37.564316 IP 192.168.2.2.33894 > 192.168.1.1.8472: UDP, length 106
Moreover, if we send broadcast packets (with ping -b or ARP
requests), they are encapsulated into multicast packets:
root@r1# tcpdump -pni eth0
11:31:27.464198 IP 192.168.1.1.41958 > 239.0.0.42.8472: UDP, length 106
11:31:28.463584 IP 192.168.1.1.41958 > 239.0.0.42.8472: UDP, length 106
Recent versions of iproute also come with bridge, a utility
allowing one to inspect the FDB of bridge-like interfaces:
root@r1# ../bridge/bridge fdb show vxlan42
3e:09:1c:e1:09:2e dev vxlan42 dst 192.168.2.2 self
0e:98:40:c6:58:10 dev vxlan42 dst 192.168.3.3 self
Demo#
For a demo, have a look at the following video: