Python and networking
Vincent Bernat
Note
This article was published in GNU/Linux Magazine HS n° 40 in 2009 in French. It is translated here to English with an LLM.
Like many languages, Python provides the full arsenal needed to build network applications. The standard library covers both servers and clients. This article explores what Python offers in this area.
The article has four parts. First, we explore how to write network clients using the standard library. Then, we tackle the server side. In these first two parts, we use high-level primitives that speed up development. In the third part, we drop down to primitives equivalent to those found in C programs. Python can, using these primitives, mimic the behavior of any network tool usually written in C. Finally, we explore a different approach with the Twisted network framework.
Writing a client#
Python’s standard library includes many modules that make it easy to write clients for a wide variety of protocols, including, for example, HTTP, FTP, POP, IMAP, SMTP, and Telnet.
Other protocols are supported too, and you can always write a module for your own protocol or find what you need among third-party modules. We focus on a few usage examples of the modules mentioned above.
These are high-level modules. They perform many tasks in a single command to establish a connection without requiring you to deal with the details. For instance, the FTP module exposes a simple function to send a file to the server. This function negotiates the data channel and manages active or passive mode automatically. These are details you do not want to deal with when writing a program that uploads or retrieves files over FTP.
We see later how to write lower-level applications and manage all network exchanges ourselves.
A simple HTTP client#
To write an HTTP client, the simplest approach is to use the urllib2 module.
It is not limited to HTTP: it handles URLs in general and supports other
protocols like FTP or GOPHER. Still, its primary use remains HTTP. It supports
authentication, proxies, redirections, and cookies. We will not explore all
available features. For details, read the online documentation.
Let us start with a simple client that retrieves the content of a web page:
import urllib2

lm = urllib2.urlopen("http://www.gnulinuxmag.com/")
print(lm.read())
This program retrieves the web page of the GNU/Linux Mag site and displays it.
You should see the HTML source of your favorite magazine’s web page. If
something goes wrong, you get an exception such as URLError or HTTPError. It
is up to you to handle this case properly.
Our first HTTP client is not very interesting. Let us write a slightly more
useful script that displays the latest CVE vulnerabilities—a mini RSS reader.
The feed is available online. Since it is XML, we can parse it with
an XML library. Python 2.5 integrated the ElementTree module, which is simple
to use. For Python 2.4 users, it can be installed separately (on Debian, it is
the python-celementtree package).
import urllib2

try:
    import xml.etree.ElementTree as ET
except ImportError:
    import cElementTree as ET
cve = urllib2.urlopen("http://nvd.nist.gov/download/nvd-rss.xml")
root = ET.parse(cve).getroot()
titles = []
for i in root.findall("{http://purl.org/rss/1.0/}item"):
    titles.append(i.find("{http://purl.org/rss/1.0/}title").text)
print("\n".join(titles))
Let us explain this code. We attempt to load the XML module ElementTree from
Python 2.5. If it is not found, we fall back to the cElementTree module, which
must be installed separately. Then, we retrieve the web page of interest and
feed it to the XML parser. Finally, we extract the elements we care about: from
the root, we search for all “item” elements. Within those, we keep only the
“title” element.
Note
We use a curious notation to find the elements in question. This
notation is due to the use of XML namespaces in the XML file. Indeed, it is
possible to mix multiple XML vocabularies within the same file, such as
XHTML with RSS. ElementTree handles these namespaces using the
notation shown in our example. Here, {http://purl.org/rss/1.0/} indicates
the RSS namespace. A more common notation would be rss:title with a prefix
declaration in the XML preamble.
Our program is already a bit more useful. We could improve it by handling the exceptions that may occur during retrieval or parsing. But that is not the purpose of this article.
Submitting a form and retrieving the content is an almost equally simple operation:
import urllib, urllib2

content = urllib2.urlopen(
    "http://www.example.com/form", data=urllib.urlencode({"p1": 6, "p2": "alpha"})
)
When the data parameter is present, urllib2 uses the POST method instead
of GET. The data must be encoded into a string the receiving application
understands. In our example, the data must be sent in the form p2=alpha&p1=6.
This is the role of the urlencode method from the urllib module.
An SMTP client#
Let us go back to our first example. Imagine we want to send the CVE
vulnerabilities by email rather than displaying them on screen. The smtplib
module handles this: it communicates with an SMTP server to send a message.
smtplib only handles the SMTP part. You need to provide it with an email
compliant with RFC 822. In its standard library, Python includes the email
module for creating such messages. In our previous program, we replace the final
display with the construction of the email:
import smtplib
from email.MIMEText import MIMEText

msg = MIMEText("\n".join(titles)
msg['Subject'] = 'Latest CVE'
msg['From'] = 'cve@example.com'
msg['To'] = 'user@example.com'
msg represents the message we want to send via SMTP. Using smtplib is
straightforward:
s = smtplib.SMTP()
s.connect()
s.sendmail("cve-bounces@example.com", ["user@example.com"], msg.as_string())
s.close()
Since we provide no parameters, neither to the SMTP constructor nor to the
connect method, the connection will be made to IP 127.0.0.1. You need a
functional SMTP server running locally. Otherwise, you can pass the SMTP server
name as the first parameter of the SMTP object constructor (or the connect
method).
We specify the sender and recipient addresses in two different places. In fact,
the SMTP protocol distinguishes between the envelope and the message. When you
receive an email, you only see the message (which includes headers and body).
When the email travels from SMTP server to SMTP server, the servers use the
envelope and ignore the message. Once the message arrives, the envelope is
destroyed. Thus, you can put whatever you want in the To: and From: fields.
What matters is what is given to the sendmail function. In our example, we
used cve-bounces@example.com as the envelope address. This way, bounces will
be received at this address (they are sent to the sender indicated in the
envelope) and any replies from the recipient will go to cve@example.com, which
is the address that will appear in the email client.
Our program remains basic and does not handle the exceptions that may occur.
An FTP client#
The ftplib module makes it easy to write an FTP client. Although this protocol
is particularly insecure, it is still the most common protocol for transferring
data to a hosting provider. It is also the protocol used when you have a
dedicated server and your hosting provider gives you storage space. Let us place
our practical example in this latter scenario: you perform daily backups of your
dedicated server into a specific directory. You now want to transfer these
backups to the space allocated to you on the hosting provider’s FTP server.
It would be possible to script an existing FTP client. But such a client would have trouble competing with what Python offers. Besides, we are in a Python special issue!
We assume the backups to transfer follow the pattern “name.xx” where “xx” is a sequence number. For example, “web.15”, “archives.17”, and so on. We will write a function that takes the name and sequence number as parameters and performs the following actions:
- check if the file already exists and upload it if it does not;
- delete files with the same name but with a sequence number that is too old.
Here is a proposal:
import re
from ftplib import FTP

dst = "/backup"
ftp_host = "ftp.example.com"
ftp_login = "login"
ftp_password = "password"
keep = 5

def upload_ftp(backups):
    ftp = FTP(ftp_host, ftp_login, ftp_password)
    remotes = ftp.nlst()
    for f in backups:
        name = "%s.%d" % (f, backups[f])
        # Upload the file if it is not present
        if name not in remotes:
            print("Envoi de %s" % name)
            ftp.storbinary("STOR %s" % name, file("%s/%s" % (dst, name)))
        # Delete old files
        for r in remotes:
            mo = re.match(r"%s\.([0-9]+)$" % f, r)
            if mo:
                current = int(mo.group(1))
                if current < backups[f] - keep + 1:
                    print("Supprime %s" % r)
                    ftp.delete(r)
                else:
                    print("Conserve %s" % r)
    ftp.quit()
The backups variable expected by the function is a dictionary whose keys are
the names and values are the sequence numbers. For example:
{ 'web': 15, 'archives': 17 }
What does it do? First, we create an FTP object by providing the hostname,
login, and password. Without the last two, the client connects anonymously. The
nlst method gives us the list of files in the current directory. This list
tells us whether the files we want to send already exist and which to delete.
Then, for each backup file, we check whether the file exists. If not, we upload
it using the storbinary method. This method performs the following actions:
- switch to binary mode,
- negotiate the data channel (active, passive, port selection, etc.),
- send the file content.
We pass as a parameter the command to send to the server. It must start with
STOR followed by the name the file should have on the server. The second
parameter is the file to upload. Anything that looks like a file to Python
works. For example, you could pass the result of urllib2.urlopen()!
Then, we look at all the files present on the server and delete the oldest ones
with the delete method.
Although the FTP protocol is quite complex to implement from scratch, the
ftplib module makes it easy with a few methods. As with the other examples,
you should add proper error handling…
And the rest?#
There remain many unexplored protocols. For some of them, Python provides a module that does the heavy lifting. You should therefore read the associated documentation, as each module offers a different interface. If you encounter a protocol that does not have a module in Python’s standard library, you have several options:
- go one level down and use the
socketmodule, as we will see later; - use the
telnetlibmodule if the protocol uses TCP and is text-oriented; - find an external module;
- use Twisted, which supports additional protocols.
When testing a server, it is common to use the telnet command. The telnet
protocol is basic, and the telnet client provided on many systems allows you to
communicate with an SMTP, POP, NNTP server, and so on. You can use Python’s
telnetlib module in similar situations. But the telnet protocol has a set of
commands invoked through a specific escape sequence. This sequence may conflict
with the protocol you are trying to implement. Make sure the telnetlib module
is only used with a telnet server or a server that does not use this escape
sequence.
The telnetlib module provides some handy methods for waiting for specific
character sequences. Still, for the reasons stated above, prefer the lower-level
methods we see later, combined with a module like pexpect that provides the
same services.
As for external modules, there are many choices, including modules that compete
with those provided in Python’s standard library. Python’s standard library does
not claim to be exhaustive, neither in supported protocols nor in functional
richness, so do not hesitate to look into community modules. For example, if you
want SSH client capabilities, the paramiko module is a good candidate.
Writing a server#
We have just seen that Python offers many modules for writing clients. For servers, the offering is much smaller. If you want to write an FTP server, for example, you will need to either use a third-party module or roll up your sleeves and write things from scratch.
Still, Python provides an SMTP server as well as an HTTP server. We do not cover the SMTP server here. Python also provides a module for writing generic servers. We cover these latter two modules.
An HTTP server#
In its standard library, Python provides several modules for writing web
servers. These modules build on the HTTPServer class from the BaseHTTPServer
module. An instance of BaseHTTPRequestHandler handles each HTTP request.
Serving static files#
The SimpleHTTPServer module provides a class inheriting from
BaseHTTPRequestHandler that serves files.
For example, if you want to serve the contents of the public_html directory in
your home folder, you can write the following code:
#!/usr/bin/env python
import os
from BaseHTTPServer import HTTPServer
from SimpleHTTPServer import SimpleHTTPRequestHandler

os.chdir(os.path.expanduser("~/public_html"))
httpd = HTTPServer(("", 8080), SimpleHTTPRequestHandler)
httpd.serve_forever()
Let us look at the last two lines in detail. We instantiate the HTTPServer
class with two parameters. The first parameter indicates, as a tuple, on which
address and port the server should listen. We provide an empty string for the
address, meaning we listen on all addresses. We could also have specified an IP
like 127.0.0.1. The second parameter is a class that will be instantiated with
three parameters for each request, whose role is to process the request. Once
the web server is instantiated, we ask it to respond to requests. That is the
purpose of the last line.
The SimpleHTTPRequestHandler class is so simple that there is no trivial way
to choose the directory to serve. We therefore change directory before serving
requests. Once this script is launched, you can test it with your browser using
the URL http://localhost:8080. You will see the contents of the public_html
directory in your home folder.
In just a few lines, you get a functional web server. Although basic, it
supports HTTP/0.9, HTTP/1.0, and HTTP/1.1 and has some security measures
preventing attacks based on adding “..” to the path. But it is inefficient: it
handles one request at a time.
Serving dynamic pages#
There is little interest in serving only static pages. To create a mini dynamic
site, you just need to write a class inheriting from BaseHTTPRequestHandler.
This class must implement methods such as do_GET, do_HEAD, do_POST, etc.
Let us look at a first simple example.
#!/usr/bin/env python
from BaseHTTPServer import HTTPServer, BaseHTTPRequestHandler

class MyRequestHandler(BaseHTTPRequestHandler):
    def do_GET(self):
        self.send_response(200)
        self.send_header("Content-type", "text/html")
        self.end_headers()
        self.wfile.write("""<html><body><h1>Hello world !</h1></body></html>""")

httpd = HTTPServer(("", 8080), MyRequestHandler)
httpd.serve_forever()
We wrote our own class to respond to requests. We can only respond to GET
requests, and we invariably return the same HTML page. The
BaseHTTPRequestHandler class provides a number of methods to make our job
easier. With the send_response method, we send the 200 response code
indicating the page was found. Then, using send_header, we send the
Content-Type HTTP header indicating that the response content is HTML. Next,
the end_headers method writes a blank line. We are then free to send whatever
content we like. The wfile attribute serves this purpose: writing to it sends
data to the client.
Try accessing the URL http://localhost:8080/test/ and you should see a page
saying “Hello world!” Not very dynamic. But you can then do whatever you want.
For example, let us rewrite the MyRequestHandler class as follows:
class MyRequestHandler(BaseHTTPRequestHandler):
    visiteur = 0

    def do_GET(self):
        self.send_response(200)
        self.send_header("Content-type", "text/html")
        self.end_headers()
        MyRequestHandler.visiteur += 1
        self.wfile.write("""<html><body><h1>Hello world !</h1>
Vous avez demandé la page %s. Votre IP est %s. Vous êtes le visiteur %d.
</body></html>""" % (self.path, self.client_address[0], MyRequestHandler.visiteur))
We get a dynamic page showing the requested page, the client’s IP, and
displaying a counter. Note that the class is reinstantiated for each request.
For the counter to persist between requests, we made it a class attribute rather
than an instance attribute, which explains why we use
MyRequestHandler.visiteur instead of self.visiteur.
Python’s standard library is not suited for writing a full web application. You would have to code session management, cookie handling, argument decoding, and URL-to-function mapping yourself. On top of that, you have to write HTML manually. A framework like Django or Twisted provides such features for free.
A TCP server#
The HTTPServer class actually inherits from a more generic class that allows
programming arbitrary servers. Python’s standard library provides classes to
facilitate writing TCP or UDP servers. These classes are in the SocketServer
module. There, you can find for example the TCPServer class, which we will use
to write a small server that provides some system information.
We define a very simple protocol for this server: upon connection, the user can
issue commands such as uptime and df. The server then returns the output of
these commands and closes the connection. This is not unlike the basic operation
of an HTTP server.
As with writing an HTTP server, we must define a TCPServer instance and
provide it with a class that will be instantiated for each request. Let us first
see how to use TCPServer. We will then see how to build the server we just
described.
#!/usr/bin/env python
import os
from SocketServer import TCPServer, StreamRequestHandler

class MyRequestHandler(StreamRequestHandler):
    def handle(self):
        self.wfile.write("Votre est IP est %s. Au revoir\n" % self.client_address[0])

tcpd = TCPServer(("", 2020), MyRequestHandler)
tcpd.serve_forever()
The structure is very similar to our HTTP server! We define a class inheriting
from StreamRequestHandler. It gets instantiated for each connection and must
handle it from start to finish. We then create the TCP server by instantiating
TCPServer and ask it to continuously serve incoming connections.
You can test this very simple server using the nc program:
$ nc localhost 2020
Votre est IP est 127.0.0.1. Au revoir
For each connection, the TCP server will instantiate MyRequestHandler and
call, among others, the handle method. When this method returns, the
connection is closed. To build our TCP server as we defined it, we rewrite our
program as follows:
#!/usr/bin/env python
import os
import time
import commands
from SocketServer import TCPServer, StreamRequestHandler

class MyRequestHandler(StreamRequestHandler):
    def handle(self):
        self.wfile.write("Que puis-je faire pour vous ?\n")
        ligne = self.rfile.readline().strip()
        if hasattr(self, "do_%s" % ligne):
            getattr(self, "do_%s" % ligne)()
        else:
            self.wfile.write("Commande inconnue.")
        self.wfile.write("\n")

    def do_uptime(self):
        status, uptime = commands.getstatusoutput("uptime")
        self.wfile.write(uptime)

    def do_df(self):
        status, df = commands.getstatusoutput("df -h")
        self.wfile.write(df)

TCPServer.allow_reuse_address = True
tcpd = TCPServer(("", 2020), MyRequestHandler)
tcpd.serve_forever()
We modified the MyRequestHandler class. Now, we read a line (thus waiting for
client input), then look for a function matching the requested command and
execute it. If the function does not exist, we return a generic message. Adding
new commands is therefore straightforward.
This simplistic example does not handle errors, and if problems occur within a
MyRequestHandler instance, the connection is terminated, but the server
remains fully functional.
Our server has a major flaw: it can only handle one connection at a time. Try the following experiment: open two terminals. Connect to the server from the first one, do not type any command, then try to connect from the second. As long as the connection is not closed on the first terminal, you will not see the banner appear on the second! Indeed, your server handles only one simultaneous connection.
There are several solutions for handling multiple simultaneous connections. Among them are using threads or multiple processes. In the first case, a thread is created to handle each new connection. The second case is identical, but processes are used instead of threads.
Python provides two classes derived from TCPServer: ThreadingTCPServer and
ForkingTCPServer. Instead of instantiating TCPServer, instantiate one or the
other of these classes. You can then handle multiple connections simultaneously.
Try it!
We now know how to write both clients and servers using the various modules in Python’s standard library. We now go one level lower and use the same primitives as in C. This can be useful to write a server without threads or multiple processes while still handling multiple simultaneous connections. Or for fun.
Using low-level primitives#
When writing clients or servers in C, it often comes down to a few basic
primitives, namely the BSD sockets API. There are higher-level
frameworks that make the task easier, especially to integrate a server or client
into a graphical toolkit (such as Qt or GTK), but most of the time, functions
like socket(), bind(), listen(), connect(), accept(), etc. are used. A
description can be found in the ip man page (section 7), as well as in the
udp and tcp man pages (also in section 7).
To write a TCP client (for UDP, it is slightly different, but that does not matter much for our example), you need to:
- open a socket with
socket(); - establish a connection to a remote server with
connect(); - send data with
send()or receive data withrecv(); - finish with
close().
For a TCP server, you use the following functions:
- open a socket with
socket(); - allocate a local port with
bind(); - listen on this port with
listen(); - accept an incoming connection with
accept(), which provides a new socket specific to the client; - send data with
send()or receive data withrecv(); - terminate the connection with the client using
close(); - close the server socket with
close().
Writing a client#
Let us revisit our simplistic examples. How could we write an HTTP client in C using the primitives described above? The code below represents a simplistic client. But this is not a C special issue. We only want to show a prototype application.
#include <stdio.h>
#include <stdlib.h>
#include <netinet/in.h>
#include <arpa/inet.h>
#include <sys/types.h>
#include <sys/socket.h>

int main() {
  int s;
  struct sockaddr_in serv;
  char request[] = "GET / HTTP/1.0\r\nHost:www.gnulinuxmag.com\r\n\r\n";
  char buffer[200];
  serv.sin_family = AF_INET;
  serv.sin_port = htons(80);
  serv.sin_addr.s_addr = inet_addr("91.121.166.153");
  if ((s = socket(PF_INET, SOCK_STREAM, 0)) < 0) {
    perror("socket(): ");
    exit(1);
  }
  if (connect(s, (struct sockaddr *)&serv,
              (socklen_t)sizeof(struct sockaddr_in)) < 0) {
    perror("connect(): ");
    exit(1);
  }
  if (send(s, request, sizeof(request), 0) < 0) {
    perror("send(): ");
    exit(1);
  }
  if (recv(s, buffer, sizeof(buffer), 0) < 0) {
    perror("recv(): ");
    exit(1);
  }
  buffer[199] = '\0';
  printf("Nous avons reçu ceci:\n\n%s\n\n", buffer);
  return 0;
}
Let us comment on our code. We begin with the socket() call. Its purpose is to
create a communication endpoint for sending and receiving data. We must specify
the domain (an IPv4 socket here with PF_INET), the type (SOCK_STREAM, which
in practice means we want reliable communication—and for IPv4, the system
understands this as TCP), and a protocol number set to 0 since there is nothing
left to choose.
Our socket is not connected to anything. If we tried to send data on it, the
system would reject it. We connect it to a remote server using the connect()
primitive. If you are not familiar with C, the corresponding line may seem
cryptic. connect() takes as its first parameter the socket we just obtained.
The second parameter is a structure indicating which server we want to contact.
We filled this structure in the first lines of the program, specifying the
family (IPv4), the target port in network byte order (which is the reverse of
x86), hence the use of htons() for the conversion, and the host address. We
hardcoded the IP in the program. Otherwise, we would additionally need to
perform a name resolution. Things get a bit more complicated. The function
expects a struct sockaddr type, and we provide a struct sockaddr_in (which
corresponds to the type for IPv4). The complex notation is therefore there to
perform the conversion so the compiler is satisfied. If we wanted to communicate
over IPv6, we would have used struct sockaddr_in6.
If everything goes well, we are now connected. We can then use the send() and
recv() functions to send or receive data. We send a handcrafted HTTP request
and receive the first 200 bytes in response. Let us compile and test:
$ gcc web1.c -o web1
$ ./web1
Nous avons reçu ceci:

HTTP/1.1 200 OK
Date: Sat, 10 May 2008 12:46:10 GMT
Server: Apache/2.2.6 (Debian) DAV/2 PHP/5.2.3-1+b1
X-Powered-By: PHP/5.2.3-1+b1
Last-Modified: Tue, 29 Apr 2008 10:01:15 GMT
Cache-Control: mu
Our buffer is not large enough to receive more than the beginning of the
headers. But there you go, our HTTP client in C is done. But wait, are we not in
a Python special issue? Let us convert it to Python. We need to use the
functions from the socket module. The result has a certain family resemblance
to the C version.
import socket

s = socket.socket(socket.AF_INET, socket.SOCK_STREAM, 0)
s.connect(("213.186.60.195", 80))
s.send("GET / HTTP/1.0\r\nHost:www.gnulinuxmag.com\r\n\r\n")
buf = s.recv(200)
print("Nous avons recu ceci:\n\n%s\n\n" % buf)
We start by creating our socket. The parameters are the same as in C. Since the
constants belong to the socket module, we must look them up in that namespace.
Then, we connect our socket to the remote server. Here, no complicated
conversions: we pass a tuple containing the IP and port. The connect primitive
from the socket module does a bit more than calling the C socket function.
Then, we send our request and receive the response, which we display. Let us test:
$ python ./web4.py
Nous avons recu ceci:

HTTP/1.1 200 OK
Date: Sat, 10 May 2008 13:03:51 GMT
Server: Apache/2.2.6 (Debian) DAV/2 PHP/5.2.3-1+b1
X-Powered-By: PHP/5.2.3-1+b1
Last-Modified: Tue, 29 Apr 2008 10:01:15 GMT
Cache-Control: mus
The result is identical, but we saved a lot of lines of code compared to the C version. We no longer have to manually handle errors, as the exception mechanism does it for us.
Note that this Python program does not quite correspond to the example with
urllib2 at the beginning of the article. If the server had responded with a
redirect, the program using urllib2 would have automatically followed it,
while our program would not.
Writing a server#
Let us now move on to writing a server. Like our first Python server example, it will accept the connection, display the client’s IP, and close the connection. We will write our program directly in Python, which makes things easier:
import socket

s = socket.socket()
s.bind(("", 2020))
s.listen(5)
while True:
    conn, client = s.accept()
    conn.send("Votre IP est %s\n" % client[0])
    conn.close()
As with the client, we create a socket. No need to request an IPv4 socket of
type SOCK_STREAM: these are the default parameters of the socket function.
We then indicate which port we will use. We specify that we will listen on all
available interfaces on port 2020. In C, we would have had to fill a structure
and use INADDR_ANY instead of the empty string. If we wanted to restrict the
server to the local machine, we would have used 127.0.0.1 as the first element
of the tuple passed to bind. Then, we tell the operating system to start
listening on our socket. We tell the operating system to queue up to 5
connections for us. Thus, if our program is too busy to accept new connections,
the operating system will put them on hold. Beyond 5, the system refuses new
connections.
We then enter an infinite loop to process connections from each client that may
come our way. We use the accept function. In C, it returns a socket for
communicating with the client and passes the client’s address by modifying the
last two arguments. In Python, the function returns both as a tuple.
Note
For a server, there is one socket per client. If TCP is used, each
socket corresponds to an IP and a port. Two sockets are therefore needed to
make a connection: the server’s (server IP, port on which the server
listens) and the client’s (client IP, port on which the client awaits
responses, usually a random high port). Before using a socket, it must be
associated with this pair. This is the purpose of the bind function. This
function is automatically called by connect in the case of a client if it
was omitted, which explains its absence in our HTTP client example. Other
types of sockets exist. For example, a named Unix socket uses a filename
rather than an IP/port pair. To communicate on the same socket, two
processes must bind to the same path. Readers interested in socket internals
can refer to the man pages for socket, ip, tcp, udp, raw, and unix in
section 7.
Our server is more fragile than the one presented earlier. If an error occurs in
the loop, the server terminates. This was not the case when using the
TCPServer class.
Finally, our server only processes one connection at a time. This is not an issue for our simplistic example, but if you are waiting for user input, nobody else can connect in the meantime! Let us modify our program to accept user input.
#!/usr/bin/env python
import os
import commands
import socket

s = socket.socket()
s.bind(("", 2021))
s.listen(5)
while True:
    conn, client = s.accept()
    conn.send("Que puis-je faire pour vous ?\n")
    ordre = conn.recv(30).strip()
    if ordre == "uptime":
        status, uptime = commands.getstatusoutput("uptime")
        conn.send("%s\n" % uptime)
    elif ordre == "df":
        status, df = commands.getstatusoutput("df -h")
        conn.send("%s\n" % df)
    else:
        conn.send("Je n'ai rien compris.\n")
    conn.close()
The beginning is identical to the previous version. We then send a prompt asking the user to enter an action. We then encounter an important functional difference with the version using higher-level primitives: we read at most 30 characters. If we wanted to read complete lines properly, we would have to handle the splitting and reassembly ourselves, while Python provided a dedicated class for this purpose. For our example, it does not matter much. The rest is straightforward.
You can repeat the test: open two terminals, connect to the server from one,
then connect from the other. The second arrival will not get the prompt until
the first has finished the connection. In the previous case, we solved the
problem by substituting TCPServer with a derived class handling one process
per connection. Here, such a manipulation is not as simple: we will have to
manage this aspect ourselves. We will use the fork primitive available in the
os module. There are other solutions, including the threading module.
#!/usr/bin/env python
import os
import commands
import socket

s = socket.socket(socket.AF_INET, socket.SOCK_STREAM, 0)
s.bind(("0.0.0.0", 2022))
s.listen(5)
while True:
    conn, client = s.accept()
    if os.fork():
        # Nous sommes dans le pere
        conn.close()
    else:
        # Nous sommes dans le fils
        conn.send("Que puis-je faire pour vous ?\n")
        ordre = conn.recv(30).strip()
        if ordre == "uptime":
            status, uptime = commands.getstatusoutput("uptime")
            conn.send("%s\n" % uptime)
        elif ordre == "df":
            status, df = commands.getstatusoutput("df -h")
            conn.send("%s\n" % df)
        else:
            conn.send("Je n'ai rien compris.\n")
        conn.close()
        os._exit(0)
After accepting a connection, we use the fork function. This function
duplicates the current process, and both copies run simultaneously with a very
slight difference between them. In the child, fork returns 0, while in the
parent, it returns the child’s PID. This difference allows us to execute
different code in each case.
If we are in the parent, we close the socket and go back to the loop to accept a new client. Closing the socket does not terminate the connection, as the socket is still open in the child. The connection will only end when this socket is closed.
In the child, we do our work as before. At the end, we terminate the process
with the _exit function from the os module. This function avoids all the
side effects of the regular exit function that could affect the child.
You can now repeat the test: we can handle multiple connections at once. Our
example is not perfect: we leave zombie processes everywhere. The parent should
acknowledge each child’s termination with waitpid. The simplest way to do this
is to set up a signal handler. But that is well beyond the scope of this
article.
What is it good for?#
Looking at these examples, one might wonder why we would use low-level primitives. The code is longer, less Pythonic, and has additional limitations and fragilities. So many drawbacks. Is there any benefit beyond the educational aspect? Low-level primitives become necessary when trying to go beyond what the high-level primitives offer. For example, the TCP server provided by Python only allows using a single process (but handling only one connection at a time in that case), using threads, or using multiple processes. Imagine that none of these approaches suits us. We want to handle multiple connections, but with a single thread and a single process. Yes, it is possible, but we must use the low-level primitives!
There are several methods to achieve such a result. One of them is to use the
select module containing the select function, which monitors a list of file
descriptors waiting for an event to occur on one of them. It is a fairly
low-level function with capabilities equivalent to the select() function in C,
made slightly more Pythonic by handling exceptions.
How shall we proceed? We will maintain the list of connecting clients ourselves
and monitor their activity with the select function. If a client sends data,
the select function tells us and we perform the necessary actions. This way,
we will not be blocked if a client becomes inactive. The select function takes
a list of descriptors (sockets are descriptors) and returns when any of these
descriptors becomes available (for a read descriptor, this means new data is
available to read).
#!/usr/bin/env python
import os
import commands
import socket
import select

s = socket.socket()
s.setsockopt(socket.SOL_SOCKET, socket.SO_REUSEADDR, 1)
s.bind(("", 2022))
s.listen(5)
conns = [s]
while True:
    rlist, wlist, xlist = select.select(conns, [], [])
    for r in rlist:
        if r == s:
            conn, client = s.accept()
            conn.send("Que puis-je faire pour vous ?\n")
            conns.append(conn)
        else:
            ordre = r.recv(30).strip()
            if ordre == "uptime":
                status, uptime = commands.getstatusoutput("uptime")
                r.send("%s\n" % uptime)
            elif ordre == "df":
                status, df = commands.getstatusoutput("df -h")
                r.send("%s\n" % df)
            else:
                conn.send("Je n'ai rien compris.\n")
            r.close()
            conns.remove(r)
Let us examine the code starting from the select call. Select accepts three
sets of descriptors as parameters: those on which we are waiting for data, those
for which we are waiting for write availability, and those for which we are
waiting for events such as connection closure or an error. We only populate the
first type of descriptors. The select call will therefore block until one of
the descriptors in the conns list has data available. When we accept a new
connection, we add it to this list. When we close a connection, we remove it. We
also add our server socket to this list. If a new connection can be accepted,
select will also return. The function returns three sets: the set of
descriptors ready for reading, those ready for writing, and those in an
exceptional condition. Each of these sets is a subset of the parameters. Thus,
in rlist, we get a subset of conns.
In rlist, we have the subset of descriptors from conns from which we can
read at least one byte without blocking. If one of the members is the server
socket, it means we can accept a new connection. For the others, we perform the
usual actions.
Test this program to verify it works as expected. You can indeed open multiple connections to the server while only a single process is running. However, this program has several important flaws:
- We use
selectonly for reading; thesendcalls can block (which should not happen on a socket). - We count on receiving the complete command on the first attempt. With TCP, this is not guaranteed. If the client sent the command character by character, it would not work. We would therefore need to reassemble the command before taking action.
- If the command to execute takes a long time, our program is blocked during its
execution. Since there is only one thread and one process, this means
everything is blocked. We would need to use
selecton the standard output of these programs, which would complicate the code.
Fixing these flaws requires several additional lines of code. We will not study them here. This example allows us to introduce the next section of this article. There exist frameworks in Python that allow writing asynchronous code (i.e., code that avoids all blocking calls). Among them is Twisted!
Using Twisted#
Twisted defines itself as the engine for your Internet. It has two essential characteristics:
- It is a very comprehensive network framework for building both clients and servers using a wide variety of protocols: HTTP, SMTP, IMAP, POP, SSH, DNS, FTP, IRC…
- It is asynchronous and event-driven, meaning actions are associated with events that occur (such as the arrival of a packet).
Support for many protocols is a strength of Twisted. Not only does it support more protocols than Python’s standard library, but these protocols are most often available as both client and server. Moreover, these are typically complete implementations. For example, the SSH server supports SFTP and the SSH client can use an agent. This is an important point for Twisted developers: the goal is to provide production-grade implementations.
The asynchronous aspect of Twisted can be disconcerting. When an action is blocking, you provide a function that runs when the action completes. So when you want to read a network packet, you provide a function that receives the packet as a parameter. The Twisted engine calls this function when the packet arrives. In the meantime, it can handle other tasks, such as accepting a new connection. The advantages of such an approach are numerous:
- There is no need to manage inter-process communication or thread concurrency issues.
- Scalability is more predictable; for example, handling 200,000 simultaneous connections is not a problem (aside from memory and CPU consumption), whereas it would be problematic if each connection had to be managed by a separate process.
- Performance can be better. A piece of code only yields control when it performs a blocking action (often network-related). The rest of the time, it uses 100% of the CPU. Keep in mind that Twisted is a network framework. This efficiency applies to network applications. If you were to write a database with Twisted, the mechanisms offered would not be as efficient. For example, Twisted does not handle asynchronous file reads from disk.
If you are not convinced of Twisted’s performance, here are two open-source products that use it and deliver remarkable performance thanks to it:
Using Twisted also brings some drawbacks:
- Asynchronous programming can be difficult to grasp. In Twisted, it translates into the need to define many functions to react to events. The code therefore cannot be read as a single block. Still, it is possible to write more conventional-looking code using Python 2.5’s new iterators.
- There is only one process, only one thread. Multi-core machines are therefore not exploited. But these cores are available for other processes (the database, for example). Twisted does offer the ability to manage multiple processes or threads, but in that case, some advantages of asynchronous programming are lost.
- Asynchronous programming makes tracebacks harder to understand, which can make debugging applications quite painful: when an exception occurs, if it happens during the processing of a deferred call, the context corresponding to that deferred call is no longer available.
- The documentation sorely lacks examples. It is sometimes quite difficult to know how to assemble the various building blocks to achieve the desired result. The documentation contains some very good tutorials, but beyond that, you will often need to read the source code.
- Twisted is very comprehensive and aims to adapt to most situations. It therefore uses very high-level concepts that you do not necessarily see in other projects: interfaces, components, factories, etc. It has many features that allow, for example, managing authentication using either a flat file or a database. The same authentication engine can be used to obtain an entity representing a user for a web server (associated with a session) or a set of mailboxes. Twisted uses the concepts mentioned above to properly nest things together, but these can be difficult to approach.
It is impossible to cover Twisted entirely in a single article. A previous issue of GNU/Linux Magazine already contained an excellent introduction to Twisted. We try a different approach by presenting simple examples corresponding to what we previously did without Twisted. Some examples will be enhanced to demonstrate Twisted’s power.
Asynchronous programming with Twisted#
For readers who may not have read the previously mentioned introduction to Twisted, we will cover here the basics of asynchronous programming with Twisted.
We have already written an asynchronous application using the select system
call. Twisted does not expose such a method. When your program performs a
potentially blocking action, you call a function that immediately returns a
Deferred object. You can then attach actions to this object. These actions run
either when the expected data is available or when an error occurs. The Twisted
engine, called a reactor, maintains a list of all these objects and executes the
attached methods as events occur.
To better understand this principle, let us revisit our very first example. We reproduce it here:
import urllib2

lm = urllib2.urlopen('http://www.gnulinuxmag.com/')
print(lm.read())
How do we do it with Twisted? There is a blocking action, which is reading the
web page. Twisted simplifies our life by offering an equivalent of urllib2,
but adapted to its engine. Here is a similar program using Twisted:
from twisted.web.client import getPage
from twisted.internet import reactor

def printContents(content):
    print(content)
    reactor.stop()

deferred = getPage("http://www.gnulinuxmag.com/")
deferred.addCallback(printContent)
reactor.run()
It is a bit longer. Let us see step by step how it works. Twisted has a library
for writing a web client. We import the method we need. We also import the
Twisted engine: the reactor. It has two methods: run and stop. The first
method starts the reactor. Starting the reactor initiates an infinite loop that
manages the various events. This loop is similar to what Qt and GTK use. There
is even a reactor compatible with the GTK loop. The loop stops when you call
stop. Do not try to restart it with run. Calling stop generally terminates
the program, and Twisted can no longer be used afterwards.
Let us ignore the printContent function for now. We call the getPage
function with the page we want to retrieve as a parameter. This action is not
immediate. A network socket must be opened, the domain name resolved, an HTTP
request made, and then the response awaited. The getPage function does all of
this, just as urlopen did. But the latter did not return until it had
contacted the server. With Twisted, functions that perform potentially blocking
actions return immediately. They return a Deferred object that you can attach
actions to.
In our example, we capture this Deferred object in a variable and attach a
callback to it—a function that will be called when the data becomes available.
This attachment is done using the addCallback method of the Deferred object.
It takes as its first parameter a function, here printContent. Additional
parameters can be given, which will be passed to printContent.
When the web page content is available, the reactor will call the printContent
function with the page content as the first parameter. In general, the function
declared as a callback receives the expected data as its first parameter. It can
take additional parameters that must then be provided when calling
addCallback.
Our printContent function displays the obtained page and then stops the
reactor. This last action allows the program to terminate.
Let us look again at the very first program in this article. What happens if the requested URL does not exist? For example, if the requested page returns a 404 error? We get an exception. We can handle it as shown in this example:
import urllib2

try:
    lm = urllib2.urlopen("http://www.gnulinuxmag.com/")
    print(lm.read())
except:
    print("Impossible de récupérer la page")
What happens with Twisted? Nothing happens—the program does not return, but does not display anything either. If you interrupt it with Ctrl+C, it tells you:
Unhandled error in Deferred:
Traceback (most recent call last):
Failure: twisted.web.error.Error: 404 Not Found
Twisted only calls the printContent function on success. In case of an error,
you must provide another function to handle it. We then partially lose Python’s
exception mechanism. It is still possible to raise exceptions, but to catch
them, you must attach functions designed for that purpose. Let us modify our
example.
from twisted.web.client import getPage
from twisted.internet import reactor

def printContent(content):
    print(content)
    reactor.stop()

def handleError(error):
    print("Une erreur est survenue :")
    print(error)
    reactor.stop()

deferred = getPage("http://www.gnulinuxmag.com/ooo")
deferred.addCallback(printContent)
deferred.addErrback(handleError)
reactor.run()
We declared a new function that takes the error as a parameter (it is actually
an instance of the Failure class). We attach this function to the Deferred
object obtained earlier using the addErrback method.
To conclude this introduction to asynchronous programming with Twisted, one last subtlety: you can chain callbacks:
from twisted.web.client import getPage
from twisted.internet import reactor

def printContent(content):
    print(content[:100])
    return 18

def addTwo(number):
    return number + 2

def printResult(number):
    print("J'ai obtenu %d" % number)

def finalCallback(dummy):
    print("Fini!")
    reactor.stop()

deferred = getPage("http://www.gnulinuxmag.com/")
deferred.addCallback(printContent)
deferred.addCallback(addTwo)
deferred.addCallback(printResult)
deferred.addBoth(finalCallback)
reactor.run()
Our program will retrieve the specified page. On success, it will display the
first characters of the page. Still on success, the addTwo function will be
called. It takes as a parameter whatever printContent returned. On success,
the printResult function will be called. Finally, in all cases, the
finalCallback function is called, which stops the reactor. Running this
program, we get:
<!DOCTYPE html PUBLIC "-//W3C//DTD XHTML 1.0 Strict//EN" "http://www.w3.org/TR/xhtml1/DTD/xhtml1
J'ai obtenu 20
Fini!
It is thus possible to chain callbacks. Each callback uses the result of the
previous callback. A callback can also return a Deferred. In that case, the
next callback will only be called when the content associated with that
Deferred is available, receiving said content as its parameter. You can also
raise an exception or return a Failure object. In that case, the next error
callback in the chain takes over.
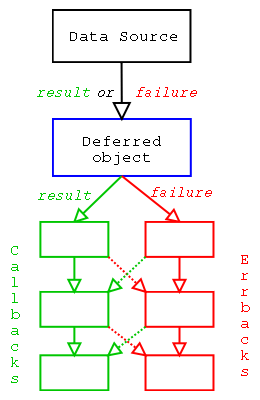
Figure 1 shows the expected behavior for the following pseudo code. The red
arrow is followed in case of error (exception or Failure object returned by
the function), while the green arrow is followed in all other cases.
deferred.addCallbacks(callback1, errback1)
deferred.addCallbacks(callback2, errback2)
deferred.addCallbacks(callback3, errback3)
The addCallbacks function registers both a callback and an errback
simultaneously. This is slightly different from the following code:
deferred.addCallback(callback1)
deferred.addErrback(errback1)
Indeed, in the first case, errback1 will only handle errors from getPage,
while in the second case, it will also handle errors that may have occurred in
callback1. To summarize: if a callback or errback raises an exception or
returns a Failure object, the next errback in the chain will handle it.
Otherwise, the next callback in the chain takes over.
Writing a server with Twisted#
First, we write a server equivalent to the one we wrote to illustrate the use of
select. To do this, we will use the twistd program provided with Twisted. It
will handle a number of things for us, including reactor management (starting
and stopping), daemonization, and logging.
Discovering twistd#
The twistd program can take different types of files as input. We will focus
on the option that lets us provide a Python file to evaluate. In that case, we
must define an application variable that is an instance of
twisted.applications.service.Application. The minimal example is then the
following (which we call exemple.py):
from twisted.application import service

application = service.Application("exemple")
Let us try launching it to see what happens:
$ twistd -n -o -y exemple.py
2008-06-14 18:54:32+0200 [-] Log opened.
2008-06-14 18:54:32+0200 [-] twistd 8.1.0 (/usr/bin/python 2.5.2) starting up
2008-06-14 18:54:32+0200 [-] reactor class: <class 'twisted.internet.selectreactor.SelectReactor'>
If we press Ctrl+C, the application shuts down cleanly:
2008-06-14 18:55:11+0200 [-] Received SIGINT, shutting down.
2008-06-14 18:55:11+0200 [-] Main loop terminated.
2008-06-14 18:55:11+0200 [-] Server Shut Down.
We passed the -n, -o, and -y parameters to twistd. The first indicates
that we do not want it to daemonize, so we keep control. Otherwise, it would run
in the background and logs would be written to syslog. The second tells it not
to save the application state on exit. Indeed, Twisted provides features for
taking a snapshot of an application to restart it from the same point later.
Finally, the last parameter indicates that we will provide a Python file.
During startup, twistd indicates which reactor it is using (select-based in
our case). Others exist. Consult the man page to learn how to choose a different
reactor.
First steps toward a functional server#
Our application is currently not very interesting: we created an application
that does nothing. We will attach a service to it. This service will listen on a
port and, for each connecting client, ask a special entity (Factory) to create
a Protocol instance that will communicate with the client. When multiple
clients are connected, they each have their own Protocol instance, but there
is only one Factory instance. When there are no clients, the Factory
instance is still there. In practice, this instance stores persistent
information (which clients can potentially modify).
Let us see what this looks like. Before writing our command server, let us write a server that says hello, echoes everything we send it, and keeps track of the number of clients. Here is the code!
from twisted.application import internet, service
from twisted.internet.protocol import Protocol, Factory

class SimpleProtocol(Protocol):
    def connectionMade(self):
        self.factory.numClients += 1
        self.transport.write("Bonjour ! Il y a %d clients.\n" % self.factory.numClients)

    def connectionLost(self, reason):
        self.factory.numClients -= 1

    def dataReceived(self, data):
        self.transport.write(data)

class SimpleFactory(Factory):
    protocol = SimpleProtocol

    def __init__(self):
        self.numClients = 0

application = service.Application("exemple")
myfactory = SimpleFactory()
myservice = internet.TCPServer(2022, myfactory)
myservice.setServiceParent(application)
We define two classes. The first inherits from the Protocol class and
communicates directly with the client. The connectionMade method is called
when the connection is established, connectionLost when it is severed, and
dataReceived when data is received. An instance of this class contains a
reference to the Factory instance it depends on. This allows us to store the
client count. It also contains a reference to a transport object that lets us
actually send data to the client. This object has a write method that we use
to echo the received data back to the client.
The second class is the factory that provides Protocol instances for each
client. It must contain a buildProtocol method returning a Protocol instance
capable of communicating with the client. We inherit this method from Factory.
It will instantiate the protocol attribute that we initialized to
SimpleProtocol. This method is also responsible for linking the Factory
instance to the created Protocol instance.
Finally, after defining our application, we instantiate our factory and create a
service that will use this factory to obtain a Protocol instance capable of
communicating with the client. We attach this service to our application so that
it starts when the application launches.
Let us see how it works!
$ twistd -noy exemple2.py
2008-06-14 19:15:12+0200 [-] Log opened.
2008-06-14 19:15:12+0200 [-] twistd 8.1.0 (/usr/bin/python 2.5.2) starting up
2008-06-14 19:15:12+0200 [-] reactor class: <class 'twisted.internet.selectreactor.SelectReactor'>
2008-06-14 19:15:12+0200 [-] __builtin__.SimpleFactory starting on 2022
2008-06-14 19:15:12+0200 [-] Starting factory <__builtin__.SimpleFactory instance at 0x18cc2d8>
And from another terminal, we can connect.
$ nc localhost 2022
Bonjour ! Il y a 1 clients.
Allo ?
Allo ?
If you connect from other terminals, the client count will increase. All is well.
A note on Twisted concepts#
Twisted uses many object-oriented concepts that take getting used to. Reading the introductory articles on Twisted is important for understanding each principle. If you are familiar with the concept of “Design Patterns,” you recognized the factory pattern in use. Without going into details, the motto of such an approach is maximum decoupling: the service does not know how to create the protocol directly; it calls an intermediary that does. Not linking the service to the protocol may seem unnatural at first, but it provides flexibility later: this intermediary can, for example, decide not to provide the protocol immediately or to provide a different protocol depending on the client (e.g., if there are too many clients).
A second concept to get used to is the use of interfaces. We saw above that we
had to provide the service with a Factory instance having a buildProtocol
method. This is actually inaccurate. In general, Twisted does not require
objects to be instances of specific classes. It asks you to provide an instance
that respects an interface, i.e., that has a certain number of methods and
attributes. To create a service, you must therefore provide an object that
respects the IProtocolFactory interface. You can use or inherit from the
Factory class, but it is not mandatory. Some interfaces have no canonical
class. In that case, to create a class that respects such an interface, you must
write each method declared in the interface and indicate that the class
implements the desired interface (with implements). For an introduction to
interfaces, readers are invited to refer to the article on the Zope Component
Architecture in this issue. Note, however, that Twisted only uses part of this
architecture and reimplements certain parts (the adapter registry, for example).
Therefore, it is also advisable to read the introduction to interfaces and
adapters in the Twisted documentation. It is essential reading
for going further with Twisted.
The Twisted API documentation indicates for each object which interface it respects and, for each interface, which classes implement it.
This notion of interfaces also contributes to decoupling between objects. By requesting an object that respects a given interface, you allow the implementation to be changed easily. This is similar to using abstract classes (classes that must be inherited from, with all declared methods implemented).
First implementation of the command server#
We will now tackle a first implementation of the command server. If we adapt the
code we used to demonstrate the select function, we get the following code:
import commands
from twisted.protocols.basic import LineReceiver
from twisted.application import internet, service
from twisted.internet.protocol import Protocol, Factory

class SimpleProtocol(LineReceiver):
    delimiter = "\n"

    def connectionMade(self):
        self.transport.write("Que puis-je faire pour vous ?\n")

    def lineReceived(self, line):
        ordre = line.strip()
        if ordre == "uptime":
            status, uptime = commands.getstatusoutput("uptime")
            self.transport.write("%s\n" % uptime)
        elif ordre == "df":
            status, df = commands.getstatusoutput("df -h")
            self.transport.write("%s\n" % df)
        else:
            self.transport.write("Je n'ai rien compris.\n")
        self.transport.loseConnection()

application = service.Application("exemple")
myfactory = Factory()
myfactory.protocol = SimpleProtocol
myservice = internet.TCPServer(2022, myfactory)
myservice.setServiceParent(application)
To shorten the code, we used a small shortcut that avoids declaring a class
inheriting from Factory. We create a Factory instance and modify the
protocol attribute.
Another novelty: we do not inherit from Protocol, but from one of its
specializations, LineReceiver, which offers the ability to receive commands
line by line. The dataReceived method of Protocol did not guarantee that we
would receive exactly one line each time. Here, no such problem. This class
provides the lineReceived method, which is called with the received line as a
parameter. The rest of the code is similar to what we did when presenting
select.
The application appears to behave exactly the same way. But it also has the same
flaws. Using the commands module is blocking. If one of the commands blocks
(for example, if df takes a long time to return due to NFS mounts), our
application freezes: it is impossible to open new connections or use existing
ones.
We did not present a version correcting this flaw when we were using select,
because it was quite tedious. With Twisted, it is much simpler! Twisted provides
a set of classes to help us achieve this. First, you can communicate with an
external process just as with a network client. We could therefore create a
protocol that reads everything the process sends us and forwards it to the
client. But there is something even simpler! Twisted already has a function for
this. Let us see:
from twisted.protocols.basic import LineReceiver
from twisted.application import internet, service
from twisted.internet.protocol import Protocol, Factory
from twisted.internet import utils

class SimpleProtocol(LineReceiver):
    delimiter = "\n"

    def connectionMade(self):
        self.transport.write("Que puis-je faire pour vous ?\n")

    def lineReceived(self, line):
        ordre = line.strip()
        if ordre == "uptime":
            output = utils.getProcessOutput("/usr/bin/uptime")
            output.addCallbacks(self.sendOutput, self.sendError)
        elif ordre == "df":
            output = utils.getProcessOutput("/bin/df", ("-h",))
            output.addCallbacks(self.sendOutput, self.sendError)
        else:
            self.transport.write("Je n'ai rien compris.\n")
            self.transport.loseConnection()

    def sendOutput(self, output):
        self.transport.write(output)
        self.transport.loseConnection()

    def sendError(self, reason):
        self.transport.write("Uh?\n")
        self.transport.loseConnection()

application = service.Application("exemple")
myfactory = Factory()
myfactory.protocol = SimpleProtocol
myservice = internet.TCPServer(2022, myfactory)
myservice.setServiceParent(application)
We used the getProcessOutput function. This function allows us to introduce a
Deferred object in a real application for the first time. It returns a
Deferred object since the process execution is blocking. While the process
runs, the reactor performs other tasks such as accepting new clients or
processing existing ones.
For this Deferred to have an effect, we attach callbacks. The sendOutput
method on success and the sendError method on failure (for example, if the
command does not exist). When results are available, the sendOutput method
will be called with the command’s output as an argument. We write the result and
close the connection.
Note that in the lineReceived method, we do not close the connection at the
end of the method (except for unrecognized commands). If we did, the connection
would close before the result could be displayed (and this in all cases; the
code is never preempted!).
We have built our first fully asynchronous application with Twisted. That was not so difficult, was it?
What about security?#
Let us say we want to put our application on the Internet so we can check disk space remotely. Currently, all information travels in clear text and there is no authentication. We will use SSL for protection. We also take the opportunity to ask for a password before accepting a command. Here is the new code:
from twisted.protocols.basic import LineReceiver
from twisted.application import internet, service
from twisted.internet.protocol import Protocol, Factory
from twisted.internet import utils, ssl

class SimpleProtocol(LineReceiver):
    delimiter = "\n"

    def connectionMade(self):
        self.transport.write("Le mot de passe ?\n")
        self.authenticated = 0

    def lineReceived(self, line):
        if self.authenticated == 0:
            password = line.strip()
            if password != "toto":
                self.transport.loseConnection()
            else:
                self.transport.write("Que puis-je faire pour vous ?\n")
                self.authenticated = 1
            return
        ordre = line.strip()
        if ordre == "uptime":
            output = utils.getProcessOutput("/usr/bin/uptime")
            output.addCallbacks(self.sendOutput, self.sendError)
        elif ordre == "df":
            output = utils.getProcessOutput("/bin/df", ("-h",))
            output.addCallbacks(self.sendOutput, self.sendError)
        else:
            self.transport.write("Je n'ai rien compris.\n")
            self.transport.loseConnection()

    def sendOutput(self, output):
        self.transport.write(output)
        self.transport.loseConnection()

    def sendError(self, reason):
        self.transport.write("Uh?\n")
        self.transport.loseConnection()

application = service.Application("exemple")
myfactory = Factory()
myfactory.protocol = SimpleProtocol
myservice = internet.TCPServer(2022, myfactory)
myservice.setServiceParent(application)
sslcontext = ssl.DefaultOpenSSLContextFactory("/tmp/privkey.pem", "/tmp/cacert.pem")
sslservice = internet.SSLServer(2023, myfactory, sslcontext)
sslservice.setServiceParent(application)
We added some code to ask for a password at the beginning of the lineReceived
method. Then, we added a service to our application: these are the last three
lines. To test, you need to create the key pair and self-signed certificate as
follows:
$ cd /tmp
$ openssl req -new -x509 -keyout privkey.pem -out cacert.pem -days 1000
And to test:
$ openssl s_client -host localhost -port 2023
Simple, isn’t it? We are beginning to see the advantages of decoupling. We kept the same protocol and added a new service wrapping our protocol in SSL. The TCP service is still available.
Adding a web interface#
Why not add a web interface? Twisted allows you to easily create a web server. Here is what we need to add to our code:
from twisted.web import server, resource

class SimpleWeb(resource.Resource):
    isLeaf = True

    def render_GET(self, request):
        ordre = request.path[1:]
        if ordre == "":
            return """<html><ul>
<li><a href="/df">df</a></li>
<li><a href="/uptime">uptime</a></li>
</ul></html>"""
        if ordre == "uptime":
            output = utils.getProcessOutput("/usr/bin/uptime")
            output.addCallback(self.sendOutput, request)
        elif ordre == "df":
            output = utils.getProcessOutput("/bin/df", ("-h",))
            output.addCallback(self.sendOutput, request)
        else:
            return """<html>Je n'ai rien compris</html>"""
        return server.NOT_DONE_YET

    def sendOutput(self, data, request):
        request.write("<html>Voici le resultat : <pre>%s</pre></html>" % data)
        request.finish()

website = server.Site(SimpleWeb())
webservice = internet.TCPServer(2024, website)
webservice.setServiceParent(application)
The code is not a model of beauty. We should have prepared a separate class to
share command handling between the web part and the command-line part. But we
keep this simpler approach. We instantiate a resource, turn it into a service,
and attach it to our application. This resource has a render_GET method called
each time a GET request is made. This method takes a Request instance as a
parameter, which we use to retrieve the requested path and also to respond.
There are then two ways to respond. If the response is ready, you can return a
string that will be transmitted to the client for display in their browser. But
when the response is not ready, we must return a special value
(server.NOT_DONE_YET). In that case, you can call the write method of the
Request object as many times as you want and finish with the finish method
call. This is what we do in our callback.
Note
This approach is not consistent with Twisted’s philosophy. It would
have been more natural to return a Deferred object. Like Rome, Twisted was
not built in a day. This is a flaw that is corrected in the new generation
of web servers for Twisted.
To test, point your browser to http://localhost:2024.
Twisted’s web framework is relatively complete. You can associate classes with
certain URLs to modularize the web site construction. But it remains fairly
basic. For example, it does not include a template engine for building web pages
more cleanly. A new version is under development (web2), but do not use it
yet. Its strengths will gradually be integrated into the current module. In the
meantime, use Nevow, a complete web framework built on top of Twisted.
SSH access?#
Twisted provides a module called conch for writing SSH clients or servers. Let
us see how to add SSH access. SSH is a complex protocol offering many
possibilities: various authentication methods, the ability to open multiple
channels, opening a terminal, remote command execution, etc. Twisted tries to
simplify its use while allowing all subtleties to be exploited. One might have
hoped for something as simple as listening on a TCP port, but unfortunately such
a level of abstraction does not exist. Twisted provides a module that hides most
of the complexity for simple use. But we cannot easily reuse our existing
SimpleProtocol class, because the expected protocol must respect the
ITerminalProtocol interface. There does not appear to be an adapter between
the two interfaces at the moment. We will once again duplicate code for the sake
of simplicity. Here is the SSH part of our application:
from twisted.conch.manhole_ssh import ConchFactory, TerminalRealm
from twisted.cred import portal, checkers
from twisted.conch import avatar, interfaces, recvline
from twisted.conch.ssh import session
from twisted.conch.insults import insults
from zope.interface import implements

class MySSHProtocol(recvline.HistoricRecvLine):
    def lineReceived(self, line):
        ordre = line.strip()
        if ordre == "uptime":
            output = utils.getProcessOutput("/usr/bin/uptime")
            output.addCallbacks(self.sendOutput, self.sendError)
        elif ordre == "df":
            output = utils.getProcessOutput("/bin/df", ("-h",))
            output.addCallbacks(self.sendOutput, self.sendError)
        elif ordre == "quit":
            self.terminal.loseConnection()
        else:
            self.terminal.write("Je n'ai rien compris.")
            self.terminal.nextLine()

    def sendOutput(self, output):
        self.terminal.write(output)

    def sendError(self, reason):
        self.terminal.write("Uh?\n")

tr = TerminalRealm()
tr.chainedProtocolFactory.protocolFactory = MySSHProtocol
p = portal.Portal(tr)
users = {"admin": "toto", "root": "hello"}
p.registerChecker(checkers.InMemoryUsernamePasswordDatabaseDontUse(**users))
sshfactory = ConchFactory(p)
sshservice = internet.TCPServer(2025, sshfactory)
sshservice.setServiceParent(application)
Let us start from the end. Twisted provides an entire infrastructure for
authentication, designed to be as generic as possible. This infrastructure is
not limited to SSH but can be reused for a web server, for example. The Twisted
documentation provides a complete introduction to this system.
The centerpiece is the Portal object. It interacts with the protocol to obtain
the user’s identification elements. It then submits them to various verification
mechanisms. Here, we instantiated only one: password verification with an
in-memory database stored in a dictionary. Once the user is authenticated, the
Portal object contacts a Realm object that must return an avatar—a
representation of the user adapted to the requested context (here an SSH user).
We therefore instantiate various objects to build the Factory object that will
be used to construct the service. During instantiation, we find an opportunity
to attach our protocol. It is nearly identical to the protocol used for
plaintext and SSL connections. The transport is replaced by a terminal that
requires some additional precautions. Since the terminal is cleared before
closing the connection, we accept multiple commands and add a quit command.
Conch is considered one of Twisted’s most complex modules. It is currently undergoing significant refactoring to make it more consistent with other modules. Still, we managed to write our SSH server in a few lines. We now have a secure application supporting password authentication that we can extend to also support key-based authentication.
Conclusion#
Python is a first-class language for writing any type of network application. Its standard library covers both high-level and low-level primitives, close to those offered in C. Many third-party contributions enrich existing capabilities by supporting additional protocols.
Combined with the productivity and readability that characterize Python, these capabilities let you design applications that directly or indirectly leverage the network.
For ambitious projects, take a look at Twisted. If you adapt to the asynchronous paradigm, it will reward you with its versatility and robustness.